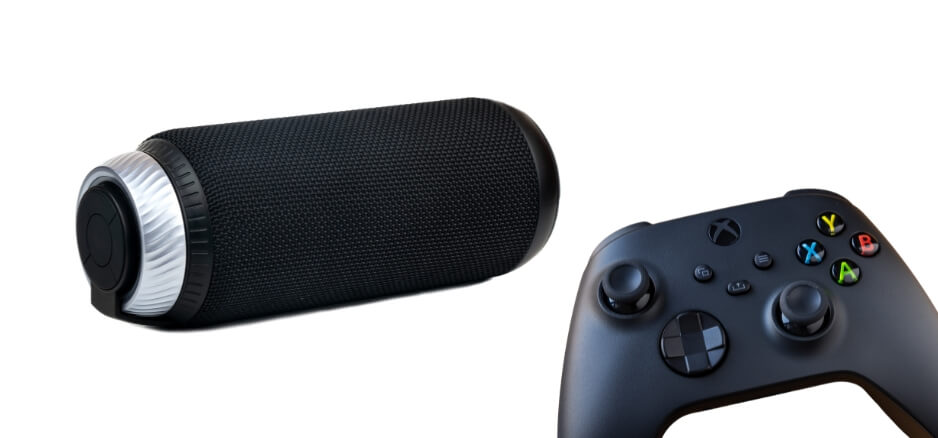
If you’re looking to enhance your gaming experience on Xbox One by connecting a Bluetooth speaker, you might be wondering how to do it without an adapter. We’ll take you through the process of pairing a Bluetooth speaker with your Xbox One without the need for an adaptor in this article.
Whether you want to immerse yourself in the game’s sound effects or enjoy crystal-clear audio during multiplayer sessions, we’ve got you covered. So let’s dive in and discover how you can easily connect your Bluetooth speaker to Xbox One without the hassle of using an adapter.
How to Connect Bluetooth Speakers to an Xbox One
Are you tired of being limited to the audio output of your TV while gaming on your Xbox One? Now, stop worrying! Here’s how to use Bluetooth technology to improve your audio setup: let’s get started. Prepare to enjoy more immersive gaming experiences with unrestrained freedom and crystal-clear sound.
STEP 1 : Connect Phone and Xbox to the Same Wi-Fi Network
Make sure your phone and Xbox One are linked to the same Wi-Fi network in order to pair your Bluetooth speaker with your console without the need for an adaptor. Because it enables smooth communication between the devices, this phase is crucial.
Take these actions to accomplish this:
Navigate to the “Settings” section on your Xbox One.
Go to “Network” and choose “Network Settings.”
Choose the Wi-Fi network you want to use from the list of available networks, and if asked, provide the necessary password.
Once connected, take note of the network name.
Now, let’s move onto connecting your phone:
Locate the Wi-Fi settings by opening the settings app on your phone.
Find the Wi-Fi network that you linked your Xbox One to, then choose it.
If asked, provide the password.
STEP 2 : Turn on Remote Features
On your Xbox, browse to the home screen and click the gear symbol, which stands for Settings, to enter the General Settings. After navigating to Settings, choose “Devices & Connections.”
Once in “Devices & Connections,” locate and click on “Remote Features.”
To activate the Remote Features, ensure the checkbox next to “Enable Remote Features” is selected or ticked.
After enabling Remote Features, proceed to the “Power Mode” section. Click on the box labeled “Power Mode” and select the option “Instant On.”
Enabling Instant On helps maintain connectivity and allows for quicker startup times on your Xbox.
STEP 3 : Connect Bluetooth Speaker to Phone
Turn on the speaker and set it to pair mode.
Open your phone’s Settings menu.
Tap on “Bluetooth” or “Connections” in Settings.
Activate your phone’s Bluetooth.
Select the Bluetooth speaker from the device list that appears.
Accept the pairing request on your phone.
Once paired, your phone will confirm the successful connection.
To make sure your phone’s audio plays over the Bluetooth speaker, play some music or other sounds.
Warning: Your phone’s battery will be rapidly depleted while using the Xbox Remote Play software. Please ensure that your phone is fully charged before using the app.
STEP 4 : Download the Xbox App to your Phone
Here are the actions that you need to follow to get the Xbox App on your phone or tablet:
Launch the application store on the mobile device you are using. Users of iOS could access this via the Apple App Store, while users of Android could get it through the Google Play Store.
Enter “Xbox App” into the search field, and then click the search button to further your search.
Find the official Xbox App in the list of search results, and then touch on it to enter the page that is intended just for the Xbox App.
Once you are on the Xbox App page, tap on the “Download” or “Get” button to initiate the download process.
Once connected, takeIt may take a few seconds for the application to download and install on your device, depending on the speed of your internet connection. note of the network name.
You will be able to locate the Xbox App icon on your home screen or in your app drawer after the installation completion process has been completed.
You may make an account and sign in by tapping on the symbol.
STEP 5 : Connect to Xbox
After logging into the Xbox app, locate and tap on the connection icon. This icon typically features an Xbox logo combined with a Wi-Fi signal and can be found in the upper right-hand corner of the application interface.
Once you’ve identified the connection icon, proceed by selecting the option labeled “Remote Play on this Device.” This option should be visible after tapping on the connection icon.
STEP 6 : Connect Controller
Access the Xbox interface on your phone.
Turn on the Xbox controller and put it in sync mode.
Open Xbox app settings on the phone.
Connect the controller to the phone via app prompts.
To browse the Xbox UI, use the controller.
Test an app or song for audio through the connected Bluetooth speaker on the phone speaker.
Troubleshooting Tips for Common Issues during Connection Process
Pairing Failure:
Issue: Inability to establish a connection between the Bluetooth speaker and Xbox One.
Solution:
Check that the Bluetooth speaker is set to pair.
Restart both the Xbox One and the Bluetooth speaker.
Check for any signal interference and move closer to the Xbox.
Delete previous Bluetooth pairings on the Xbox and reattempt the pairing process.
Audio Lag:
Issue: Delay or latency between the audio output and the visuals on the screen.
Solution:
Ensure the Bluetooth speaker is fully charged and within range.
Make sure the Bluetooth speaker has the most recent firmware.
Reduce the distance between the Xbox One and the Bluetooth speaker to minimize latency.
Poor Sound Quality:
Issue: Substandard or distorted sound output despite the connection being established.
Solution:
Confirm the Bluetooth speaker isn’t connected to other devices simultaneously.
Adjust Xbox One audio settings to optimize for the Bluetooth speaker.
Check for physical obstructions blocking the Bluetooth signal.
Try adjusting audio settings on both the Xbox One and the Bluetooth speaker for improved sound quality.
Conclusion
Overall, it’s easy to connect a Bluetooth speaker to your Xbox One without an adapter. This simple step may really elevate your gaming experience. By following the simple steps outlined in this guide, you can easily pair your Bluetooth speaker with your Xbox One console and enjoy high-quality audio without the need for additional adapters. To make the link go smoothly, make sure that both your speaker and computer are in pairing mode and close to each other. After reading this, it should be easy for you to enjoy full music on your Xbox One while playing games or watching movies.
FAQ
Q1: Can I connect a Bluetooth speaker to my Xbox One without using an adapter?
A1: Yes, it is possible to connect a Bluetooth speaker to your Xbox One without the need for an adapter.
Q2: Can I use multiple Bluetooth speakers with my Xbox One at once?
A2: No, currently, the Xbox One does not support using multiple Bluetooth speakers simultaneously. You can only connect and use one Bluetooth speaker at a time.
Q3: Are there alternative methods if my Xbox One does not have built-in support for Bluetooth connectivity?
A3: If your Xbox One does not have built-in support for Bluetooth connectivity, you can consider using alternative methods such as purchasing a separate audio adapter that provides wireless connectivity options, or using wired connections like HDMI or auxiliary cables.
Q4: What if I don’t have built-in Bluetooth on my Xbox One or my speaker doesn’t support A2DP?
A4: In such cases, you may need an external adapter that converts the audio output from your console into a signal compatible with your non-Bluetooth speakers or headphones.
Q5: Are there any limitations when using a connected Bluetooth speaker with my Xbox One?
A5: While connected, you may experience some limitations such as potential audio lag or decreased audio quality compared to using wired speakers.
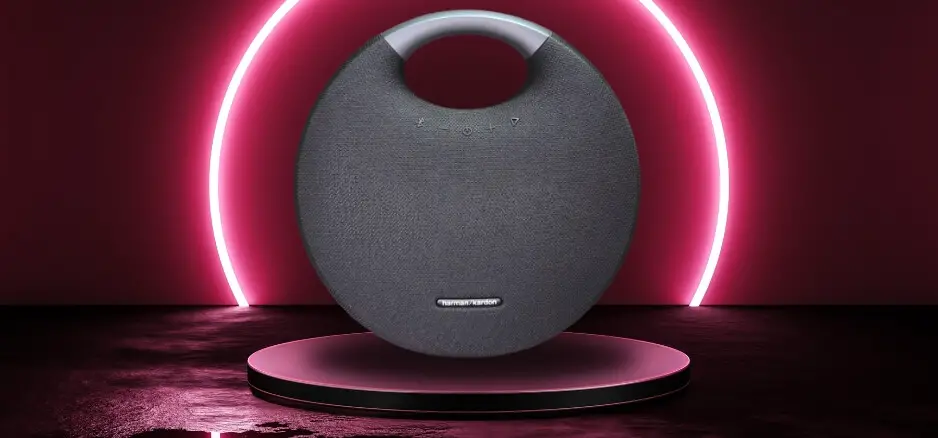
Welcome to our comprehensive guide on how to reset your Harman Kardon speaker. Resetting your speaker may often fix common difficulties, whether you want to start again or you’re having trouble with it. We’ll guide you through the exact steps of resetting your Harman Kardon speaker 0-23in this post so you can continue to have the best possible sound quality and uninterrupted listening. So let’s dive in and discover the simple yet effective methods to reset your Harman Kardon speaker.
Steps to Reset Harman Kardon Speaker
When it comes to resetting your Harman Kardon speaker, it’s important to follow the correct steps to ensure a successful reset. In this section, we will guide you through the process, providing you with the necessary information that you need.
Pressing the power button:
To begin the reset process, locate the power button on your Harman Kardon speaker and press and hold it for a few seconds. This will initiate the powering off sequence.
Disconnecting from power source:
After turning off your speaker, find the power source and unplug it from the speaker. You may do this by taking the gadget out of its plug or, if necessary, taking out the batteries.
Exploring reset options (specific to model):
Different models of Harman Kardon speakers may have varying methods for performing a factory reset. For detailed instructions unique to your model, it recommended that you consult the user guide that came with the gadget or go to the manufacturer’s website.
Step-by-step guide for performing a factory reset:
If you are unable to find model-specific instructions, don’t worry! We’ve got you covered with a generic step-by-step guide that can be applied in many cases:
i) Verify that your speaker is unplugged from all power sources and turned off.
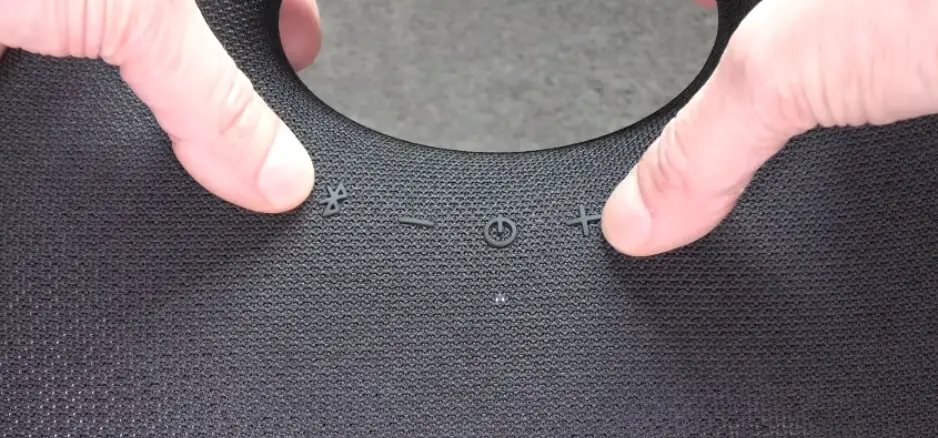
ii) Locate any buttons or switches on your device that are labeled “Reset” or “Factory Reset”. These are often located on the device’s bottom or rear.
iii) Using a small pointed object such as a paper clip or pin, press and hold down the designated reset button for approximately 10-15 seconds.
iv) Release the reset button after 10-15 seconds and wait for your Harman Kardon speaker to complete its resetting process.
v) Once completed, proceed by turning on your speaker and following any additional setup instructions that may be required.
Alternative reset methods (if applicable)
Sometimes, the traditional methods of resetting a Harman Kardon speaker may not work or may not be accessible. In such cases, there are alternative reset methods that you can try. These alternative methods involve using button combinations or sequences and utilizing companion apps or software.
Button combinations or sequences: Some Harman Kardon speakers have specific button combinations or sequences that can be used to initiate a reset. These combinations vary depending on the model, so it is important to refer to the user manual or visit the official Harman Kardon website for instructions specific to your device.
Using companion apps or software: In recent years, many Harman Kardon speakers have come equipped with companion apps or software that allow for more advanced control and customization options. These apps often include a reset function within their settings menu. Simply open the app, go to the settings, and look for the reset button.
Not all Harman Kardon speaker models may be compatible with these other reset techniques, so keep that in mind. Always refer to the user manual provided with your device or consult official sources for accurate information on how to perform a factory reset.
By following these steps, you will be able to reset your Harman Kardon speaker effectively, allowing you to troubleshoot any issues or restore it to its factory settings. Remember, for model-specific instructions, consult the user manual or manufacturer’s website for accurate guidance.
Post-Reset Testing and Troubleshooting
After resetting your Harman Kardon speaker, it is important to perform some tests and troubleshoot any issues that may arise. You will be guided through the essential actions to guarantee a successful reset in this section.
Powering on the speaker:
Observing indicator lights: Once the reset is complete, power on your Harman Kardon speaker and pay attention to the indicator lights. These lights may provide important details about the condition of your device, such as if it is turned on correctly or if there are any connection problems.
Verifying startup sounds or notifications: Another way to confirm that your speaker has successfully reset is by listening for startup sounds or notifications. The equipment may be ready for use and operating as planned based on these auditory indications.
Reconnecting to devices:
Bluetooth pairing process: If your Harman Kardon speaker connects via Bluetooth, you will need to go through the pairing process again after resetting it. Follow the instructions provided by your specific model to establish a new connection with your desired device(s). This ensures seamless wireless playback and control.
Wi-Fi setup (if applicable): In case your Harman Kardon speaker supports Wi-Fi connectivity, you may need to set up a new connection after performing a reset. Refer to the user manual or manufacturer’s guidelines for step-by-step instructions on connecting your device to a Wi-Fi network.
Testing speaker functionality
Sound output quality check: After a reset, it is crucial to assess the sound output quality of your Harman Kardon speaker. Play various types of audio content, such as music or movies, and carefully listen for any distortion, imbalance, or lack of clarity in the sound. This step ensures that your speaker is producing high-quality audio as intended.
Connectivity with different devices: Another important aspect to test post-reset is the connectivity of your Harman Kardon speaker with different devices. Pair it with smartphones, tablets, laptops, or any other compatible devices you typically use with the speaker. Verify that the connection is stable and reliable across all devices.
Troubleshooting common issues post-reset
Addressing persistent problems: Despite resetting your Harman Kardon speaker, there might be persistent issues that require further troubleshooting. If you encounter problems such as intermittent audio interruptions or unresponsive controls after the reset, refer to the user manual for specific troubleshooting steps provided by the manufacturer.
Seeking additional support: If you are unable to resolve any lingering issues on your own or require further assistance beyond what is outlined in the user manual, consider reaching out to customer service for dedicated support from Harman Kardon’s team of experts.
By following these steps, you can ensure that your Harman Kardon speaker functions optimally after a reset and troubleshoot any potential issues effectively.
Maintenance and Best Practices
Regularly updating Firmware (if applicable)
Keeping your speaker up-to-date is like giving it a little tune-up. If your Harman Kardon speaker allows firmware updates, it’s wise to check for these regularly. These updates often bring improvements in performance, new features, and even fixes for bugs that might affect your speaker’s functionality.
Keeping the Speaker Clean and Dust-Free
Just like any prized possession, your speaker deserves a little TLC. Dust and dirt can affect its appearance and even its performance over time. To keep the speaker looking good, gently wipe it off with a clean, dry cloth. Refrain from applying strong chemicals as they might harm the finish.
Avoiding Common Issues Through Proper Handling
Treat your Harman Kardon speaker with care. Keep it out of direct sunlight, dampness, and very high or low temperatures since these may affect its functionality. Also, be mindful of where you place the speaker; keeping it away from obstructions and ensuring proper ventilation can make a difference in its longevity.
Following these maintenance tips can help extend the life of your Harman Kardon speaker and ensure you continue to enjoy its exceptional sound quality for years to come. Treat it well, and it will keep delighting you with its audio brilliance!
Conclusion
Finally, resetting a Harman Kardon speaker is an easy procedure that may assist with a number of problems. You can quickly reset your Harman Kardon speaker and return it to factory settings by following the instructions in this article. Remember to disconnect any connected devices and ensure that the speaker is powered off before initiating the reset. Resetting may often be a useful fix for issues with audio glitches or connection issues. So, if you find yourself encountering any difficulties with your Harman Kardon speaker, don’t hesitate to give the reset method a try. Get ready to enjoy uninterrupted audio performance once again!
FAQ
Q1. What is the process for resetting a Harman Kardon speaker?
A1. To reset your Harman Kardon speaker, follow these steps: Find the speaker’s power button and press it to turn it off. The speaker’s power supply should be disconnected. Await around thirty seconds before plugging the power supply back in. Your Harman Kardon speaker should reset itself when you turn it on.
Q2. Why would I need to reset my Harman Kardon speaker?
A2. Resetting your Harman Kardon speaker might be necessary for a number of reasons, including fixing connection difficulties, diagnosing audio issues, or going back to the original factory settings.
Q3. Will resetting my Harman Kardon speaker delete any saved settings or data?
A3. Resetting your Harman Kardon speaker will generally restore it to its unique original configuration. This means that any customized settings or saved data will be erased. It is advised to make a backup of any important information before carrying out a reset.
Q4. Are there different methods for resetting different models of Harman Kardon speakers?
A4. Although the general procedure for resetting a Harman Kardon speaker is the same for all models, your particular model may have a few minor differences. For comprehensive instructions specific to your specific model, see the user manual or the manufacturer’s website.
Q5. My Harman Kardon speaker is still not functioning properly after a reset. What should I do?
A5. If you have followed the reset instructions and are still experiencing issues with your Harman Kardon speaker, it is advisable to contact customer support or refer to troubleshooting guides provided by the manufacturer. Experts will be ready to help you even more in resolving any persistent problems.
Are you looking for a simple and straightforward guide on how to pair a Sylvania Bluetooth speaker? Look no further! In this guide, we will walk you through the step-by-step process of how to pair a Sylvania Bluetooth speaker effortlessly. Whether you’re using a smartphone, tablet, or computer, this comprehensive tutorial will provide you with the necessary instructions and troubleshooting tips to ensure a successful pairing experience.
So, let’s dive in and explore the simple yet effective methods for connecting your Sylvania Bluetooth speaker to your device. Follow these easy steps and enjoy seamless audio connectivity with your Sylvania speaker in no time!
Preparing Your Sylvania Bluetooth Speaker for Connection
Prior to exploring the world of wireless audio, there are a few easy steps you can do to simplify the connection process. Understanding your Sylvania Bluetooth speaker, ensuring device compatibility, and ensuring its battery is juiced up are essential before syncing it with your device. Now, let’s get started with the basics:
Understanding the Sylvania Bluetooth speaker model
Before you can pair your Sylvania Bluetooth speaker with your device, it’s important to familiarize yourself with its specific model. Each model may have varying features and functionalities, so taking the time to understand how your particular Sylvania Bluetooth speaker works will make the pairing process smoother.
Checking speaker compatibility with your device (smartphone, tablet, computer, etc.)
To ensure successful pairing between your Sylvania Bluetooth speaker and your device, it is crucial to check for compatibility. Most Sylvania speakers are designed to work with a wide range of devices such as smartphones, tablets, computers, and more. However, it’s always wise to verify if your specific device supports Bluetooth connectivity and if any additional software or app is required for seamless pairing.
Charging the Sylvania Bluetooth speaker
Before attempting to pair your Sylvania Bluetooth speaker with any device, it is essential to ensure that the speaker has sufficient battery power. Rechargeable batteries are included with most models, and they may be charged with either the included USB cable or AC adaptor. It is recommended to fully charge the speaker before attempting pairing as low battery levels can affect connectivity and performance.
Steps to Pair a Sylvania Bluetooth Speaker
If you have recently purchased a Sylvania Bluetooth speaker and are looking to pair it with your device, the process is relatively straightforward. By following these simple steps, you can quickly establish a connection and start enjoying your favorite music or audio wirelessly.
Turn on the Speaker:
Press the device’s power button to make sure the Sylvania Bluetooth speaker is switched on. You may see an LED light indicator that confirms it is ready for pairing.
Enable Bluetooth on Your Device:
Find the Bluetooth option in the settings menu on your computer, tablet, or smartphone. Enable or toggle on Bluetooth to make your device discoverable.
Search for Available Devices:
Once your device’s Bluetooth function is activated, it will start searching for nearby devices to connect with. In this case, look for a list of available devices and find the name of your Sylvania speaker in the list.
Select Your Speaker:
From the list of available devices displayed on your device’s screen, tap or click on the name of your Sylvania Bluetooth speaker to initiate pairing.
Confirm Pairing Code (if required):
Some devices may require you to confirm a pairing code when connecting via Bluetooth for added security purposes. If prompted, check both your speaker and device screens for any codes that need verification and follow any additional instructions provided.
Connection Established:
After successfully completing these steps, you should receive confirmation that your Sylvania speaker is now paired with your chosen device. Now, you may use your linked device to wirelessly stream audio or music to the speaker.
It’s important to note that specific models of Sylvania speakers might have slightly different instructions or features beyond these general steps outlined above. Therefore, referring to the user manual that came with your particular model can provide more detailed information tailored specifically for pairing procedures.
By following these simple steps and ensuring compatibility between your device and the Sylvania Bluetooth speaker, you can easily establish a seamless wireless connection and enjoy high-quality sound from your favorite audio sources.
Troubleshooting Common Pairing Issues
Speaker not appearing in the Bluetooth device list
If you’re experiencing difficulties with your Sylvania Bluetooth speaker not appearing in the device list when attempting to pair it, there are a few troubleshooting steps you can take.
Make sure the speaker is first in pairing mode and prepared for a connection. To find out exactly how to turn on pairing mode for your individual model, see the user handbook.
In case the speaker is absent from your device’s Bluetooth list even when it is in pairing mode, attempt the following steps:
Verify that your gadget and speaker are situated near one another.
Verify if any additional Bluetooth devices are linked to your device and unplug them if required.
Restarting your gadget and speaker can often fix minor connection problems.
To remove the Bluetooth cache, go to the Bluetooth section of the settings on your device. From there, find an option to clear cache or forget paired devices.
Pairing failure or unsuccessful connection
There are times when trying to link your Sylvania Bluetooth speaker with a device might provide challenges. If you experience pairing failure or an unsuccessful connection, here are some troubleshooting steps you can try:
Ensure that both devices have sufficient battery power.
Verify again that the two devices are compatible with one another and that they can connect over Bluetooth.
Before trying to link it again, reset the speaker by turning it off and back on.
Restart your device and try pairing once more.
Audio quality or connectivity issues post-pairing
If you have successfully paired your Sylvania Bluetooth speaker but encounter audio quality or connectivity issues afterward, consider these troubleshooting steps:
Ensure that there are no obstructions between the connected devices that could interfere with signal transmission.
In order to avoid any interference, see whether there are any other wireless devices in the vicinity, such as routers or cordless phones. Shift them away from the speaker if you can.
Make sure the speaker is within the recommended range of your device for optimal performance.
Restart both devices and attempt to reconnect.
You should be able to fix typical pairing problems with your Sylvania Bluetooth speaker and have a flawless listening experience by following these troubleshooting instructions. However, if problems persist, it may be necessary to consult the user manual or contact Sylvania customer support for further assistance.
Tips for Optimizing Bluetooth Connectivity
To ensure optimal Bluetooth connectivity with your Sylvania speaker, there are a few tips you can follow.
Firstly, maintaining proximity between devices is crucial. Keep your speaker and the device you’re pairing it with within a reasonable range, preferably within 30 feet or 10 meters. This will help minimize any potential signal interference and maintain a strong connection.
Secondly, it’s important to update both your device’s firmware and the firmware of the Sylvania speaker (if applicable). Bug fixes and other enhancements that might improve Bluetooth performance are often included in firmware upgrades. For fact on updating the firmware version, see the manufacturer’s website.
Lastly, check for any potential interference from other nearby devices. Bluetooth signals are susceptible to interference from other electrical equipment, including cordless phones and Wi-Fi routers, since they operate within a restricted frequency band. To test whether it helps with connection, move your speaker away from such devices or switch them off for a while.
By following these tips, you should be able to optimize Bluetooth connectivity when pairing your Sylvania Bluetooth speaker with your device.
Conclusion
In conclusion, learning how to pair a Sylvania Bluetooth speaker is a simple and straightforward process. By following the steps outlined in this guide, you can quickly connect your speaker to your desired device and enjoy wireless audio streaming. Remember to ensure that both the speaker and your device are in pairing mode, and be sure to consult the user manual for any specific instructions related to your model. With this knowledge, you can now confidently pair your Sylvania Bluetooth speaker and enhance your audio experience wherever you go.
FAQ
Q1: How do I pair a Sylvania Bluetooth speaker?
A1: Before connecting your Sylvania Bluetooth speaker, turn on the device and activate Bluetooth on your smartphone. Then, go to your device’s settings, search for compatible Bluetooth devices, choose the Sylvania speaker from the list, accept the pairing request, and play music from your smartphone to test the connection.
Q2: What are the steps to connect my device to a Sylvania Bluetooth speaker?
A2: The steps include turning on the speaker, activating Bluetooth on your device, locating Bluetooth settings, searching for available devices, selecting the Sylvania speaker, confirming the pairing request, and testing the connection with audio playback.
Q3: Can you provide a detailed guide on pairing a Sylvania Bluetooth speaker?
A3: Certainly! Refer to the detailed guide provided earlier for step-by-step instructions on pairing your Sylvania Bluetooth speaker with your device.
Q4: What devices are compatible with Sylvania Bluetooth speakers?
A4: Sylvania Bluetooth speakers are generally compatible with various devices such as smartphones, tablets, laptops, and other Bluetooth-enabled devices across different operating systems.
Q5: Is there a specific app or software needed to pair the speaker?
A5: Typically, no specific app or software is required to pair a Sylvania Bluetooth speaker. The pairing process is done directly through your device’s Bluetooth settings.
Q6: Are there any troubleshooting tips for pairing issues with Sylvania Bluetooth speakers?
A6: If encountering pairing issues, ensure both devices are in close proximity, update device firmware if applicable, and try restarting both the speaker and the device. Consult the user manual or Sylvania’s support resources for more troubleshooting tips.
Q7: Can I connect multiple devices simultaneously to a Sylvania Bluetooth speaker?
A7: Generally, most Bluetooth speakers, including Sylvania models, allow connection to multiple devices in a paired list, but only one device can actively play audio at a time.
Q8: How do I disconnect or unpair my device from the speaker?
A8: Go to your device’s Bluetooth settings, find the connected Sylvania speaker, and select the option to “Forget,” “Disconnect,” or “Unpair” the device to sever the Bluetooth connection.
Q9: Are there any additional features or settings available for Sylvania Bluetooth speakers?
A9: Sylvania Bluetooth speakers might offer additional features like speakerphone functionality, EQ settings, or button customization. For information on available features and settings, see the user manual for that particular model.
Are you on the hunt for the best center-channel speaker but have a budget of $500 or less? Look no further! In this guide, we’ll unveil the top options available in the market that deliver exceptional sound quality and immersive audio experiences without breaking the bank. Whether you’re a movie buff, a music enthusiast, or an avid gamer, finding the perfect center channel speaker is essential for enhancing your entertainment setup.
We understand that budget constraints can sometimes limit your choices, but rest assured, we have done all the research for you. Let’s dive into our top recommendations for the best center channel speakers under $500 to help you make an informed decision and elevate your audio setup to new heights.
Key Features to Consider:
The purpose of this guide is to help you find the best center channel speaker under $500 by highlighting key features to consider. A center channel speaker plays a crucial role in any home theater system, providing clear and balanced dialogue reproduction for an immersive audio experience. By focusing on the specific features of sound quality, design and build, and compatibility, we will guide you towards making an informed decision that meets your budget and audio needs. So let’s dive into the key features to study when picking the best center channel speaker under $500.
Sound Quality:
When it comes to sound quality, clarity, frequency response, and dialogue reproduction are vital aspects to evaluate. The center channel speaker should deliver crystal-clear dialogue without distortion or muddiness. Look for models that offer a wide sound range, ensuring smooth integration with existing speakers in your setup.
Design and Build:
The design and build of a center channel speaker play a significant role in its overall performance. Consider factors such as cabinet construction for enhanced durability and reduced resonance. Speaker configuration also matters – some models feature multiple drivers or tweeters for improved dispersion and smooth sound imaging.
Compatibility:
To achieve optimal performance from your center channel speaker, compatibility is crucial. Take into account factors such as compatibility with your existing home theater system or other speakers you may have. Additionally, ensure that the center channel speaker can be easily integrated with your amplifier or receiver without any technical limitations.
Our top picks for the best center channel speakers under $500
Product Name
Brand
Model Name
Speaker Type
Connectivity Technology
Buy It
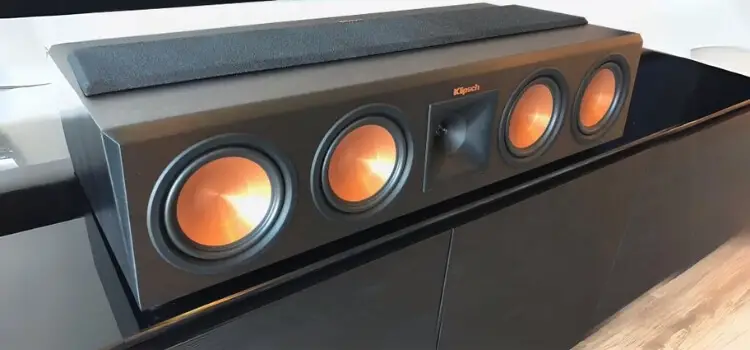
Klipsch R-52C
Klipsch
R-52C
Center Channel, Woofer
Auxiliary
Check Price On Amazon
label
Klipsch Black Reference Theater Pack 5.1
Klipsch
Reference Theater Pack 5.0
Woofer, Subwoofer, Tweeter
Wireless
Check Price On Amazon
label
Polk Audio Signa S4 Ultra-Slim
Polk Audio
Signa S4
Subwoofer, Soundbar
Bluetooth, USB, Optical, HDMI
Check Price On Amazon
label
Polk Audio Monitor XT35
Polk Audio
MXT35
Center Channel
Dolby Atmos
Check Price On Amazon
label
SAMSUNG HW-S50B/ZA 3.0ch
SAMSUNG
HW-S/ZA
Soundbar
Bluetooth, USB
Check Price On Amazon
label
1. Klipsch R-52C
Introducing the Klipsch R-52C, an exceptional speaker that will take your listening pleasure to new levels. With its powerful features and top-of-the-line performance, this speaker is a must-have for any audio enthusiast.
Key Features:
Dual 5.25″ Spun-Copper IMG Woofers: Enjoy deep and impactful bass response with two high-quality woofers that deliver rich, detailed sound.
1″ Aluminum LTS Tweeter with 90×90 Square Tractrix Horn: Experience crystal-clear highs and precise imaging thanks to the advanced tweeter technology coupled with an efficient horn design.
Impressive Frequency Response: Covering a wide range from 89Hz to 21kHz (+/-3dB), this speaker ensures accurate reproduction of every nuance in your music or movie soundtrack.
High Sensitivity: With a sensitivity of 95dB at 2.83V/1m, these speakers can produce robust sound even with low-powered amplifiers, resulting in optimal performance in various setups. Massive Power Handling Capability: Boasting a power handling capacity of up to 400 watts, this speaker can handle high-volume levels without distortion, ensuring dynamic and impactful sound reproduction.
PROS
Powerful and detailed sound reproduction
High-quality construction for lasting durability
Versatile compatibility with various audio systems
Sleek and modern design that complements any decor
Easy setup and installation process
CONS
May be considered bulky for smaller spaces
Requires additional amplification for optimal performance
Introducing the Klipsch Reference Cinema System 5.1.4, a home theater system designed to immerse you in a world-class audio experience. With its innovative features and revolutionary technology, this system will redefine your entertainment experience.
Key Features:
Dolby Atmos System: The Klipsch Reference Cinema System 5.1.4 includes four satellite speakers equipped with Dolby Atmos enabled, delivering altitude effects from both the front and rear. This allows for a truly immersive audio experience like never before, adding another dimension to your favorite movies and music.
360° Audio Experience: Whether you’re watching a movie or listening to music, the Klipsch Reference Cinema System 5.1.4 provides an incredibly realistic 360° audio experience. It fills the room with rich, dynamic sound that envelops you from all directions, bringing your content to life in ways you’ve never experienced before.
Tractrix Horn Technology: With exclusive Tractrix 90° X 90° horn technology and aluminum tweeters, the Klipsch Reference Cinema System 5.1.4 delivers impressive high-end response and greater extension. This means crystal-clear highs and detailed sound reproduction, allowing you to hear every subtle nuance in your favorite songs or movie scenes.
All-Digital Subwoofer Amplifier: The Klipsch Reference Cinema System 5.1.4’s integrated all-digital subwoofer amplifiers guarantee plenty of power, excellent efficiency, and true-to-source accuracy. You’ll feel deep bass vibrations that add depth and impact to your movies or music while maintaining precise control over every low-frequency note.
Easy Setup and Compatibility: The Klipsch Reference Cinema System 5.1.4 is designed for convenience with its simple setup process. It easily integrates into any home theater system without hassle or complicated wiring. Additionally, it is fully compatible with various devices and supports multiple connectivity options for seamless integration into your existing setup.
PROS
Immersive Dolby Atmos technology.
Incredibly realistic 360° audio experience.
High-end response and greater extension.
Powerful and accurate all-digital subwoofer amplifier.
Easy setup process and compatibility with various devices.
Introducing the Polk Signa S4, an advanced ultra-slim soundbar that will transform your home entertainment experience. With its innovative features and exceptional audio quality, this soundbar is designed to elevate your audio enjoyment to new heights.
Key Features:
Advanced Ultra-Slim Design: The Polk Signa S4 boasts a sleek and modern design that seamlessly blends into any living space. Its slim profile saves valuable space while delivering powerful, immersive sound.
Up-Firing Speakers for Height Elevation: Experience the thrill of height elevation with the integrated up-firing speakers. These speakers create a multi-dimensional soundstage, bringing films, music, and games to life with amazing clarity and detail.
Polk’s Exclusive Voice Adjust Technology: Say goodbye to muffled dialogue and hello to crystal-clear vocals. With Polk’s exclusive Voice Adjust technology, you can customize the voice levels for enhanced clarity without sacrificing the overall audio balance.
Simple 1-Cable Setup: Setting up your soundbar has never been easier. With just a single cable connection, you can effortlessly connect the Signa S4 to any TV, including the latest 8K Ultra-HD TVs, for a hassle-free setup process.
Wireless Music Streaming and Numerous Connection Possibilities: Stream the music you like wirelessly from your smartphone or tablet with the help of Bluetooth connectivity. Additionally, enjoy multiple connection options such as HDMI ARC and optical inputs for versatile connectivity to various devices.
PROS
Immersive audio experience thanks to up-firing speakers
Introducing the Polk Monitor XT35, the ultimate center channel speaker that combines sleek design and superior sound quality. With its slim profile, this center channel won’t block your TV, allowing you to enjoy a clutter-free entertainment setup.
Key Features:
Premium Build Quality and Modern Design: Crafted with precision and elegance, this speaker not only delivers outstanding audio performance but also adds a touch of sophistication to your home theater system.
High-Resolution Sound from All Inputs: Experience immersive sound with crystal-clear detail from any source. The Polk Monitor XT35 ensures exceptional audio reproduction for movies, music, gaming, and more.
Versatility at Its Best: Equipped with multiple input options such as HDMI ports and optical connections, this speaker seamlessly integrates into any setup, making it compatible with various devices for an enhanced audio experience.
Create an Affordable Home Theater Setup: Turn your living room into a movie theater on a budget. The Polk Monitor XT35 provides premium-quality sound at a reasonable price point, making a worthy choice for budget-conscious buyers.
Introducing the Samsung HW-S50B/ZA Soundbar – a game-changer in home audio entertainment. Unleash the full potential of your favorite movies, TV shows, and music with its impressive features and cutting-edge technology.
Key Features:
ALL-IN-ONE IMMERSIVE SOUND: Experience the power of Dolby Digital 5.1 and DTS Virtual:X, bringing cinematic sound to your living room. Be fully immersed in rich, detailed audio that elevates your entertainment experience.
Q-SYMPHONY: Enhance your viewing pleasure with synchronized sound from both the soundbar and compatible Samsung QLED TVs. This seamless integration creates a harmonious audio-visual experience like no other.
Integrated Center Speaker:Listen crystal clear vocals and conversation thanks to the integrated center speaker. Say goodbye to straining to hear every word – this feature ensures every line is delivered with clarity.
ADAPTIVE SOUND LITE: The soundbar adjusts the audio settings based on an automatic analysis of the content you are watching or listening to. Be it a thrilling action scene or a soft melody, you’ll always enjoy a balanced sound tailored to the moment.
MUSIC MODE: Elevate your music listening experience with dedicated Music Mode. Rediscover your favorite tracks as they fill your space with crisp highs, resonant mids, and deep bass for that live concert feel at home.
Comprehending speaker specifications is crucial in making an informed purchase. Here are key specs to consider:
Power Handling: This refers to how much power (in watts) a speaker can handle. Knowing this helps you match the speaker with an appropriate amplifier or receiver to avoid damage.
Sensitivity: Sensitivity gauges the speaker’s effectiveness in converting electrical power into sound. Expressed in decibels (dB), a greater sensitivity rating indicates a louder output for a given power level.
Impedance: This refers to the impedance a speaker presents to the electrical signal originating from the amplifier. Common values are 4, 6, and 8 ohms. Compatibility with your amplifier’s impedance output is essential for optimal performance and safety.
Setup Tips
Proper setup can greatly enhance your listening experience.
Placement Recommendations: Positioning is key. For stereo sound, place speakers at an equal distance from your main listening spot, angled slightly towards it. Avoid corners and close proximity to walls to reduce unwanted bass boost.
Calibration with Other Speakers: If you’re using multiple speakers, like in a home theater system, calibrate them to ensure a balanced soundstage. Many modern receivers offer auto-calibration tools.
Connection Options: Understand the different connection types (like HDMI, optical, or RCA) and choose a speaker with the right inputs and outputs that match your other equipment.
Maintenance and Care
Taking care of your speakers ensures longevity and consistent performance.
Cleaning: Dust your speakers regularly. Use a soft, dry cloth for the body and a gentle brush for the speaker cones.
Avoiding Common Issues: Keep your speakers away from extreme temperatures and moisture. Also, avoid cranking up the volume to levels beyond what your speakers can handle.
Warranty Information: Always check the warranty details. It can save you from unexpected repair costs. Keep your purchase receipt and understand what the warranty covers and for how long.
Conclusion
Discovering the best center channel speaker under $500 opens doors to a realm of affordable audio brilliance. With an emphasis on audio performance, design, and compatibility, these speakers redefine value. Understanding specifications, implementing setup tips, and embracing maintenance guidelines ensure a gratifying audio journey. Unleash the potential of your home theater or music setup without going over budget. Each speaker’s unique features cater to diverse preferences, making the quest for auditory excellence both accessible and rewarding. Elevate your audio experience affordably – your gateway to immersive sound starts here.
FAQ
Q1. What is a Center Channel Speaker?
A1. A surround sound system’s center channel speaker is a crucial part that specializes in reproducing dialogue and central audio elements.
Q2. Why is it Important in a Home Theater System?
A2. It anchors dialogue and central sounds, enhancing the overall audio quality and realism in home theater setups.
Q3. How to Determine Compatibility with Existing Speakers?
A3. Check specifications like impedance and power handling to ensure a cohesive soundstage and compatibility with existing speakers.
Q4. Is a Center Channel Speaker Necessary for Every Setup?
A4. While not mandatory, it significantly improves audio quality, especially in larger setups or for a more cinematic experience.
Q5. Can I Use a Center Speaker for Music Playback?
A5. Yes, it can be used for music, but for a dedicated music experience, it’s recommended to complement it with stereo speakers optimized for musical nuances.
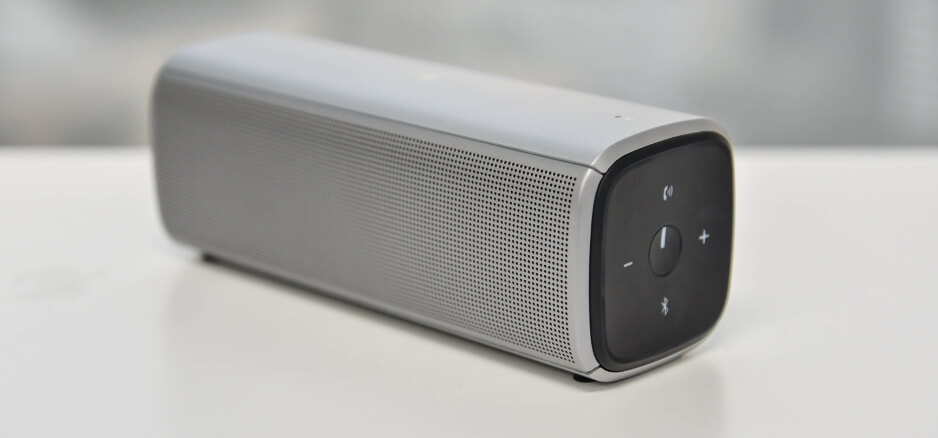
Introducing the Insignia Bluetooth speaker, a compact powerhouse designed to elevate your audio experience to new heights. This sleek device boasts a perfect blend of style and functionality, making it an ideal companion for music enthusiasts on the go. Pairing your Insignia Bluetooth speaker is not just a technical step – it’s the gateway to unlocking its full potential and immersing yourself in a world of rich, wireless sound.
We understand that the thought of pairing devices can be terrible, but fear not. Our step-by-step guide ensures a hassle-free connection process, allowing you to seamlessly integrate your speaker with your preferred devices. Say goodbye to the restriction of wired link and hug the freedom of wireless audio with Insignia – where simplicity meets superior sound.
Checking Compatibility:
Before diving into the world of wireless audio bliss, it’s crucial to ensure that your journey starts on the right note by confirming compatibility. Firstly, check if your device is Bluetooth-enabled. This foundational step lays the groundwork for the seamless connection you’re aiming for. Once you’ve examined that your gadget is Bluetooth-capable, take a moment to confirm that your Insignia speaker is suitable.
Not all devices play nice with every speaker, so it’s essential to ensure that your Insignia Bluetooth speaker is designed to sync effortlessly with your specific device. This simple check sets the stage for a harmonious partnership between your gadget and your speaker, guaranteeing you an audio experience that’s not just wireless but also perfectly tailored to your preferences.
Powering Up Your Insignia Bluetooth Speaker:
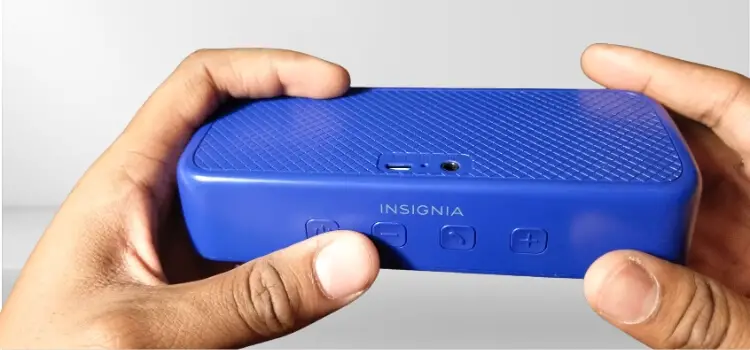
Turning on the speaker:
To power up your Insignia Bluetooth speaker, locate the power button on the device. Generally, this is situated either on the above or side of the speaker. Press and hold the power button until a light indicator or LED starts flashing or turns solid, indicating that the speaker is now turned on.
Checking battery levels for uninterrupted pairing:
Before pairing your Insignia Bluetooth speaker with a device, it is essential to ensure that the battery has sufficient charge to avoid any interruptions during the pairing process.
To check the battery levels on your Insignia Bluetooth speaker, refer to its user manual for particular instructions as various models may have little different methods. Generally, however, you can usually check battery levels by either:
Observing LED indicators: Some Insignia speakers feature LED lights that indicate battery status. These LEDs may show different colors or flash patterns to indicate varying levels of charge.
Using a companion app: If your Insignia Bluetooth speaker has a dedicated app available for download, launch it and look for options within the app to check battery levels.
Utilizing voice prompts: Certain models of Insignia Bluetooth speakers offer voice prompts that provide information about battery levels when requested.
Ensuring that your Insignia Bluetooth speaker has adequate battery charge will allow for uninterrupted and reliable pairing with your desired devices.
Activating Bluetooth on Your Device:
To pair your Insignia Bluetooth speaker with a device, you will need to activate Bluetooth functionality on your device. Here’s a step-by-step guideline on how could you active Bluetooth:
Navigating to device settings:
Unlock your device and go to the home screen.
See the Settings” app, which is generally represented by the gear icon.
Tap on the “Settings” app to open it.
Enabling Bluetooth functionality:
In the Settings menu, scroll below or search for the “Bluetooth” option.
Touch on “Bluetooth” for opening the Bluetooth settings.
If you don’t see a direct option in your settings menu, look for it within sub-sections such as “Wireless & Networks” or “Connections”.
When you’re in the Bluetooth settings, switch ON the toggle or button labeled “Bluetooth” to activate it.
Your device will start scanning for near Bluetooth gadget, including your Insignia speaker.
Now that you have activated Bluetooth on your device, you are ready to pair and connect it with your Insignia speaker according to its specific pairing instructions provided in its user manual or packaging. Keep in mind that each speaker might have slightly different pairing procedures.
Remember to put your Insignia speaker into pairing mode by following its respective instructions (such as pressing and holding a dedicated button). This allows it to be found by your device during the pairing process.
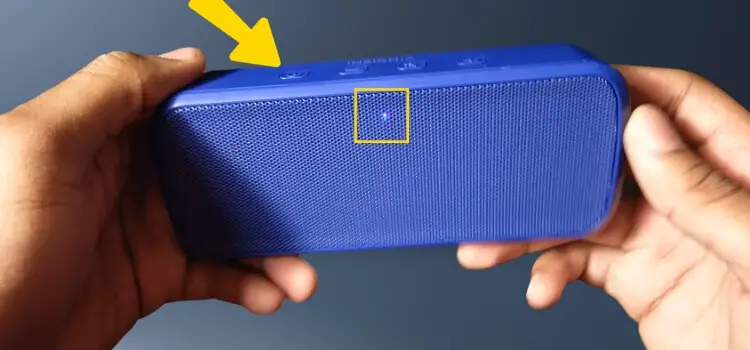
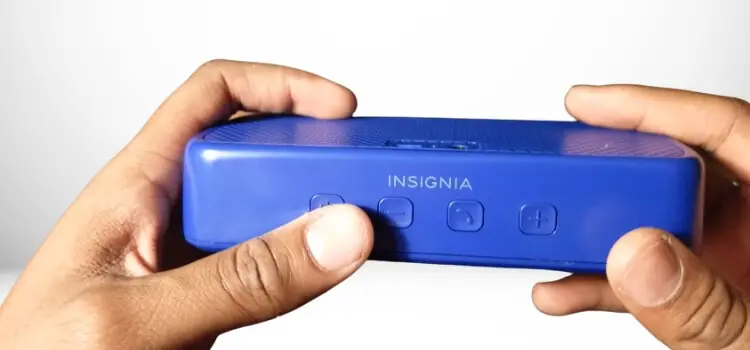
Putting Insignia Speaker in Pairing Mode:
To activate pairing mode on an Insignia speaker, follow these step-by-step instructions:
1. Ensure that your Insignia speaker is turned on and within close proximity to the device you want to pair it with.
2. On the rear of the speaker, find the power or pairing button, typically marked with a Bluetooth symbol or a pairing icon.
3. Press and hold the power or pairing button for a few seconds until a blinking light or audible tone signals that the speaker is now in pairing mode.
Upon activating pairing mode, there are visual indicators to confirm that your Insignia speaker is ready to be paired:
1. Check for a steady blinking LED light on the front or top of the speaker. This indicates that it is actively searching around the gadget to connect with.
2. Depending on the model, some Insignia speakers may have a specific color pattern for their LEDs when in pairing mode, such as flashing blue or green lights.
3. Additionally, you may also see relevant prompts displayed on the device’s screen, notifying you that it has recognized and is attempting to connect with your Insignia speaker.
By following these steps and observing the visual indicators, you can easily confirm if your Insignia Bluetooth speaker is ready for pairing and establish connections with your desired devices effortlessly
Discovering and Connecting Devices:
When it comes to pairing a Bluetooth device, such as the Insignia speaker, with your device, the first step is to scan for available Bluetooth devices. This allows your device to detect nearby devices that are discoverable.
To scan for available Bluetooth devices on your device, follow these steps:
Open the settings menu on your device.
Looking for the “Bluetooth” or “Connections” option and tapping on it to access the Bluetooth settings.
Make sure that your Bluetooth is turned ON.
Your device will initiate an automatic scan for nearby Bluetooth devices.
Once you have scanned and located the Insignia speaker in the list of available devices, you can proceed with selecting and connecting to it.
To select and connect to the Insignia speaker, follow these points:
From the list of discovered Bluetooth devices on your device, locate and tap on the entry corresponding to “Insignia” or “Insignia Speaker.”
If prompted, enter a passkey or PIN code provided with the speaker documentation or try using a default code like 0000 or 1234 (if applicable).
Wait some time for your device to set up a connection with the Insignia speaker.
Once connected successfully, you should see a confirmation message or indicator that shows you are now paired with or connected to the Insignia speaker.
Test out the connection by playing audio through your device – it should now be projected through the paired Insignia speaker.
Following these steps should allow you to pair and connect your device with an Insignia speaker via Bluetooth effectively and enjoy wireless audio playback from your preferred source.
Troubleshooting Tips:
When it comes to troubleshooting common issues with Bluetooth devices, there are a few solutions that you can try:
Common Issues and Their Solutions:
Failed Pairing Attempts:
Solution: Double-check if both the speaker and your device are in pairing mode. If unsuccessful, restart both devices and attempt the pairing process again.
Interference or Signal Drop:
Solution: Ensure there are no physical obstacles between your device and the Insignia speaker. Additionally, move away from potential sources of interference, like other electronic devices or crowded Wi-Fi networks.
Audio Quality Problems:
Solution: Check for barriers that may influence the Bluetooth signal. Also, verify if your device and speaker are in the mentioned Bluetooth range.
To ensure a stable Bluetooth connection with your Insignia Bluetooth speaker, follow these tips:
Keep your speaker and paired device within close proximity for optimal signal strength.
Minimize barriers between them such as walls or objects that may intervene with the signal.
Avoid placing other electronic devices or sources of interference near the speakers or connected devices.
Check for firmware updates for both your connected device (phone, tablet, etc.) and the Insignia Bluetooth speaker itself.
By implementing these troubleshooting tips and ensuring a stable connection between your devices, you can enjoy uninterrupted audio playback through your Insignia Bluetooth Speaker
Testing the Connection:
When attempting to pair an Insignia Bluetooth speaker, it is essential to test the connection to ensure successful pairing. This can be done through a few simple steps:
Playing a sample audio: After successfully connecting your device (such as a smartphone or computer) to the Insignia Bluetooth speaker, play a sample audio file or music track. This will confirm that the pairing process was completed successfully and that sound is being transmitted through the speaker.
Adjusting volume and settings: Once you have confirmed that the audio is playing through the Insignia Bluetooth speaker, adjust the volume and any other desired settings as needed.
According to these steps and experimental connection, you can ensure that your Insignia Bluetooth speaker is properly paired with your device and ready for use.
Conclusion
In conclusion, mastering the art of pairing your Insignia Bluetooth speaker unlocks a world of wireless audio bliss. Our hassle-free guide ensures a seamless connection, letting you enjoy the full potential of your device. Forget about cords, and say hello to a new era of submerged sound with your Insignia speaker. Elevate your auditory experience – it’s time to play, connect, and revel in the freedom of wireless music.
FAQ
Q1: How do I activate Bluetooth on my device?
A1: Navigate to your device settings, locate Bluetooth, and enable the functionality. Ensure your device is Bluetooth-enabled.
Q2: How do I put my Insignia speaker in pairing mode?
A2: Power on the speaker, find the Bluetooth or Pairing button, and press until you see a flashing light or hear a specific sound cue.
Q3: What if my devices fail to pair?
A3: Restart both the speaker and your device, ensure they are in pairing mode, and attempt the process again.
Q4: How can I troubleshoot audio quality issues?
A4: Check for obstructions, maintain proximity, and verify that both devices are in the mentioned Bluetooth range.
Q5: What should I do if the connection drops?
A5: Update firmware on both devices, ensure they are in close proximity, and perform a Bluetooth reset if issues persist.
Q6: How do I test the connection after pairing?
A6: Play a sample audio on your device to confirm successful pairing. Adjust volume and settings as needed for the optimal audio experience.
Q7: Can I customize settings on my Insignia speaker?
A7: Yes, explore volume controls, equalizer modes, and other settings on both your device and the Insignia speaker.
Having problems with your JBL speaker not turning off? These general problems can be frustrating and disadvantageous. In this section, we will discuss the possible reasons why your JBL speaker is not turning off and the importance of resolving the problem.
Understanding why this issue occurs and finding a solution is crucial to ensure optimal performance and user experience with your JBL speaker. So let’s immerse ourselves in and pursue the possible causes and solutions for why your JBL speaker won’t turn off.
Common Reasons for JBL Speaker Not Turning Off
Low Battery
You know that feeling when your smartphone’s battery is running low, and it starts behaving oddly? Well, your JBL speaker can act similarly when it’s low on battery. When the battery level gets too low, the speaker may not have enough power to execute the command to turn off properly.
Troubleshooting Steps to Check and Address Battery Issues
To tackle this issue:
Check Battery Level: Begin by checking the battery level of your JBL speaker. Some JBL models have battery indicators that give you a visual idea of how much juice is left.
Charge Your Speaker: If you find that the battery level is critically low, plug your speaker into its charger and let it charge for a while. It might need some power to respond to your commands.
Replace Old Batteries (If Applicable): If your JBL speaker has replaceable batteries, consider swapping out old ones with fresh ones. This can make a citable difference in solution power-related issues.
Bluetooth Connection
How an Active Bluetooth Connection Can Affect the Speaker’s Power
Think of your JBL speaker as a DJ at a party. When it’s connected to a Bluetooth device, it’s all set to play your favorite tunes. Turning off while the music is still playing would be like the DJ leaving in the middle of a song. That’s why an active Bluetooth connection can sometimes interfere with the speaker’s power-down process.
Solutions for Disconnecting and Troubleshooting Bluetooth Connectivity
To get your speaker to turn off peacefully:
Pause or Disconnect: First, try pausing or disconnecting the Bluetooth connection from your paired device. This will let your speaker know that the party is over.
Power Cycle: If the speaker doesn’t respond to pausing or disconnecting, try turning off both the JBL speaker and the connected device. After that, power them back on. This often helps reset the Bluetooth connection.
Forget and Reconnect: If issues persist, forget the speaker on your paired device and then reconnect it. This will establish a fresh Bluetooth connection, resolving any potential glitches.
Software/Firmware Issues
How Outdated or Corrupted Software/Firmware Can Impact Power Functions
Imagine your JBL speaker’s software/firmware as its brain. Just like your computer or smartphone, outdated or corrupted software can make your speaker behave erratically, including refusing to turn off.
Guide Users on How to Update or Reset the Speaker’s Software/Firmware
Here’s what you can do:
Check for Updates: Go to the JBL website or use their app to check for software/firmware updates for your specific speaker model. Installing the last updates can often solve such problems.
Factory Reset: If updating doesn’t work, you might need to factory reset on your speaker. This will revert its software to its original state. Be cautious, though, as this will erase any custom settings.
Physical Button Malfunctions
How Physical Button Problems Can Hinder Turning Off the Speaker
Sometimes, your speaker’s physical buttons can get a little finicky. Dust, dirt, or wear and tear can affect their responsiveness, making it difficult to turn off the speaker as intended.
Provide Instructions on Cleaning or Replacing Buttons If Necessary
To address this:
Clean the Buttons: Gently clean the speaker’s buttons with a soft, lint-free cloth. Removing any debris or grime can often restore their functionality.
Consider Replacement: If cleaning doesn’t work and the buttons are still unresponsive, you may need to explore the option of replacing them. Contact JBL support or check if replacement parts are available for your model.
By imitating these steps, you can troubleshoot and resolve common issues that might be preventing your JBL speaker from turning off. It’s all about keeping your speaker in good shape so it can rock on when you want it to and rest when you don’t!
Step-by-step instructions for checking and addressing each common issue:
If your JBL speaker is refusing to turn off, it can be frustrating. However, you can follow this steps to solve the problem and address the issue safely:
Check the Power Button:Make sure you press the power switch correctly and hold it for several seconds. Certain JBL speakers need a longer press to turn off properly.
Disconnect Bluetooth: If your speaker is connected to a device via Bluetooth, disconnect it from the device. Sometimes, an active Bluetooth connection can prevent the speaker from turning off.
Battery Level: Verify the battery status of your speaker. If it’s extremely low, the speaker might not have enough power to turn off. Charge it if needed.
Hard Reset: Perform a hard reset by pressing the power switch for about 10s to 15s. This can help in resetting the speaker’s internal settings.
Factory Reset (Advanced): If the issue persists, you can perform a factory reset (refer to your speaker’s manual for instructions). Remember, this process will delete all your speaker’s settings.
Tips for identifying the root cause of the problem:
Observe LED Indicators: Pay attention to any LED lights on your speaker. They might provide clues about the issue. For example, a blinking light could indicate a low battery.
Device Compatibility: Confirming that the instrument you are using to manage the speaker is suitable and correctly paired.
Inspect for Physical Damage: Inspect the speaker for physical damage or water exposure, which might affect its functionality.
Software Updates: Verify the availability of firmware or software updates for your JBL speaker. Updating the software could potentially resolve the issue.
Safety precautions to follow during troubleshooting:
Unplug or Disconnect Power: Before performing any troubleshooting, ensure the speaker is disconnected from its power source or charger.
Avoid Overexertion: Do not use excessive force when pressing buttons or attempting to reset the speaker. Gentle and controlled actions are recommended.
Keep Water Away: If your speaker is not water-resistant, keep it away from liquids to prevent damage.
Read the Manual: For precise instructions and safety precautions, refer to the user manual provided with your speaker.
Contact Customer Support: If you are unsure or the issue persists, it’s best to contact JBL customer support or visit an authorized service center for professional assistance.
Remember to exercise caution while troubleshooting, and if you are uncertain about any step, it’s better to seek professional help to avoid damaging your JBL speaker further.
Preventative Measures:
To avoid encountering issues with your JBL speaker, here are some preventative measures to keep in mind:
Read the user manual: Familiarize yourself with the user manual provided by JBL. This will give you a better understanding of your speaker’s features, functions, and troubleshooting steps.
Use compatible accessories: Ensure that you are using compatible charging cables, adapters, and other accessories that are recommended by JBL. Using non-certified or incorrect accessories might lead to compatibility issues and possible damage.
Avoid extreme conditions: Protect your JBL speaker from extreme temperatures and humidity levels. Prolonged exposure to high heat or moisture can negatively influence its ability to work and longevity.
Ensure software is current: Frequently monitor the official JBL website or mobile app for firmware updates tailored to your speaker model. These updates generally address bugs and increase performance, minimizing potential problems.
Tips for maintaining and caring for your JBL speaker:
To ensure optimal performance and durability of your JBL speaker, consider the following tips:
Clean regularly: Keep your speaker clean by wiping it with a soft cloth regularly. Avoid usage abrasive materials or cleaning agents that may harm the surface.
Avoid water exposure: While some JBL speakers are water-resistant, it’s important to exercise caution and avoid immersing them completely in water or exposing them to excessive moisture.
Storage when not in use: When not using your JBL speaker for an extended period, store it in a cool, dry place away from direct sunlight or extreme temperatures.
Handle with care during transport: If you need to transport your speaker, use appropriate protective cases or bags designed specifically for portable speakers to minimize the risk of accidental damage.
By following these preventative measures and tips for maintenance, you can ensure a longer lifespan and trouble-free performance for your JBL speaker.
Conclusion
In conclusion, understanding the cause behind the issue of “why won’t my JBL speaker turn off” is crucial for solving the issue effectively. By following the troubleshooting steps mentioned in this guide, you can identify the underlying causes, whether it’s a technical glitch, a software issue, or a faulty power button. Remember, patience and a systematic approach are key when troubleshooting electronic devices.
If the issue persists despite your attempts, it’s recommended to reach out to JBL customer support or consult a skilled technician for expert assistance, ensuring your speaker operates at its best. Stay proactive, stay informed, and enjoy uninterrupted music experiences with your JBL speaker.
FAQ
Q1: Why is my JBL speaker not turning off?
A1: Your JBL speaker may not be turning off due to various reasons, such as a malfunctioning power button, outdated firmware, or a software glitch. Identifying the implicit cause is crucial for searching for a resolution.
Q2: How can I troubleshoot my JBL speaker that won’t turn off?
A2: Start by ensuring the power source is stable and the speaker is properly connected. Try resetting the speaker or checking for firmware updates on the official JBL website. If the issue persists, refer to the user manual or reach out to JBL customer backing for expert assistance.
Q3: Could a low battery be causing my JBL speaker not to power off?
A3: Yes, a low battery can resist your JBL speaker from turning off correctly. Charge the speaker fully and attempt to power it off again. If the battery is damaged, consider replacing it with a compatible one.
Q4: Is there a specific button combination to turn off my JBL speaker?
A4: Yes, some JBL speakers require specific button combinations to power off. Refer to your speaker’s manual to find the correct combination, typically involving holding down the power button or pressing a combination of buttons simultaneously.
Q5: What should I do if my JBL speaker won’t turn off even after trying all the troubleshooting steps?
A5: If your JBL speaker continues to stay on despite troubleshooting attempts, it’s best to seek professional assistance. Contact JBL customer support or visit an authorized service center to diagnose and repair any potential hardware issues causing the problem.